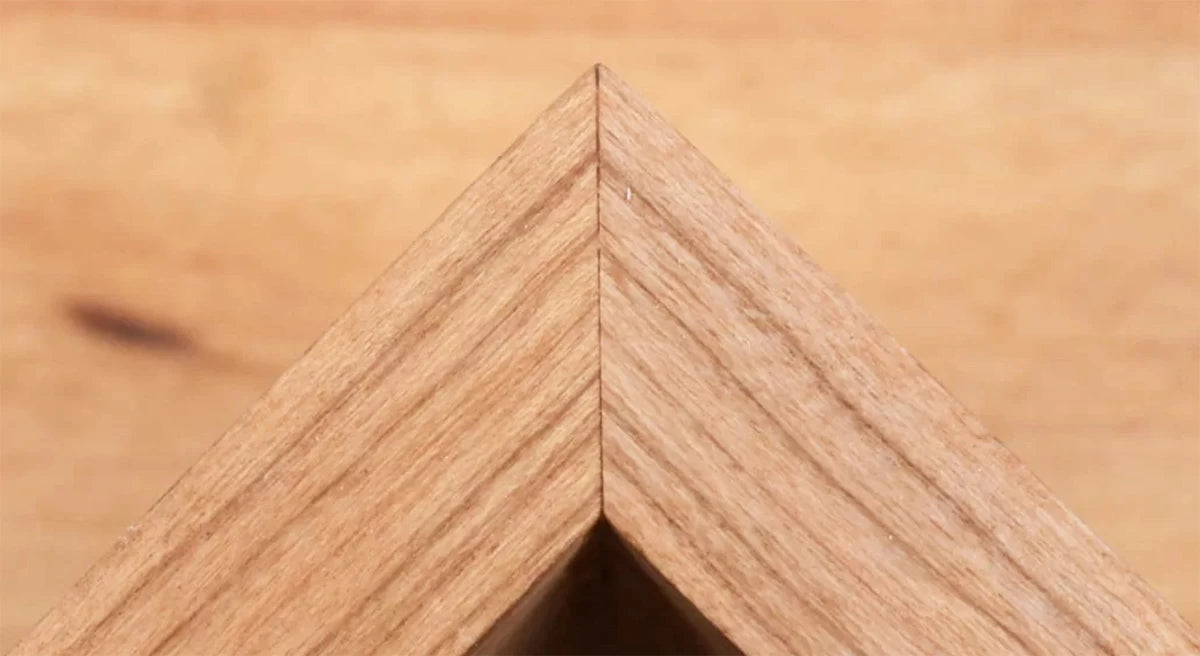
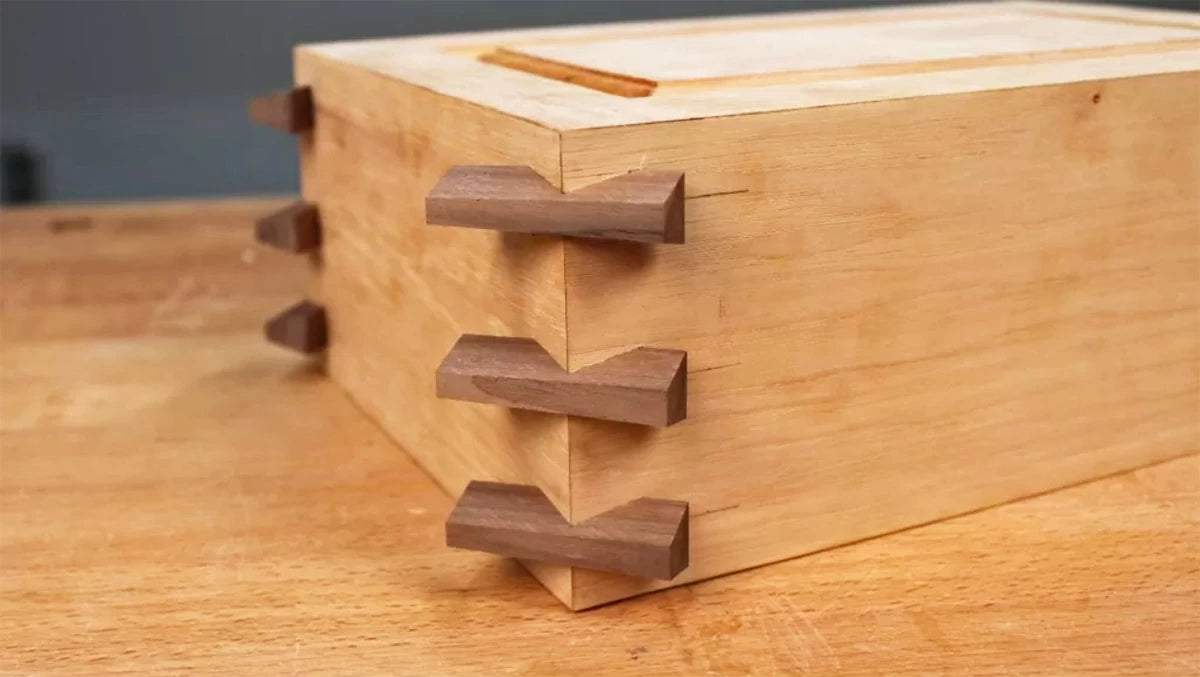
Building boxes — from small jewelry boxes and humidors to blanket chests — is a common project for woodworkers. And, as woodworkers, we're always looking for new ways to add unique details to our boxes without over-complicating the process yet still produce beautiful and strong results. The Tapered Dovetail Spline System from Infinity Cutting Tools makes it easy to add decorative, tapered dovetail splines to your boxes that not only look good, but they make for a stronger box.
This system allows you to make dovetail grooves and splines with a taper that lock into place securely. The beauty of this system is that it makes creating beautiful, gap-free joints extremely simple. It also gives you a chance to use up all those short cutoffs in the scrap bin and create projects that will leave your friends, family, and clients scratching their heads on how you did it.

Create these eye-catching joints in a few simple steps using the Infinity Tapered Dovetail Spline System. You can use a handheld router or router table to rout the tapered dovetail grooves using the router jig. The table saw sled makes cutting the tapered dovetail splines to fit the grooves a quick process. Let's take a look at each of these steps so you can see how easy this system is to use and I'll share a few tips and tricks along the way.

Step 1: Build Your Box
Before you can use the Tapered Dovetail Spline System, you need to build a box. There are a couple of tips I want to mention to make this task easier.
For hardwood boxes, I like to use a lock miter joint for the box sides. It provides a strong, interlocking joint that makes for quick box assembly.
To make this joint, I use a lock miter router bit. To make setting up the bit easier, I recommend using the Lock Miter Master Jig.
For plywood boxes, a lapped miter joint is more appropriate. It's made using a 2-pc. lapped miter router bit set. Similar to a lock miter joint, a lapped miter joint helps align parts during glue-up and adds glue surface for strength.
If you prefer a traditional miter joint when making boxes, let me offer a suggestion. Instead of using your table saw to cut the miters, use your router table and a large 45° chamfer bit, such as the 36-950 router bit from Infinity Tools. You'll get more accurate results and a glue-ready edge.
Step 2: Position the Spline Router Jig
Once your box is assembled, you're ready to add some decorative touches and strength with the Tapered Dovetail Spline System.
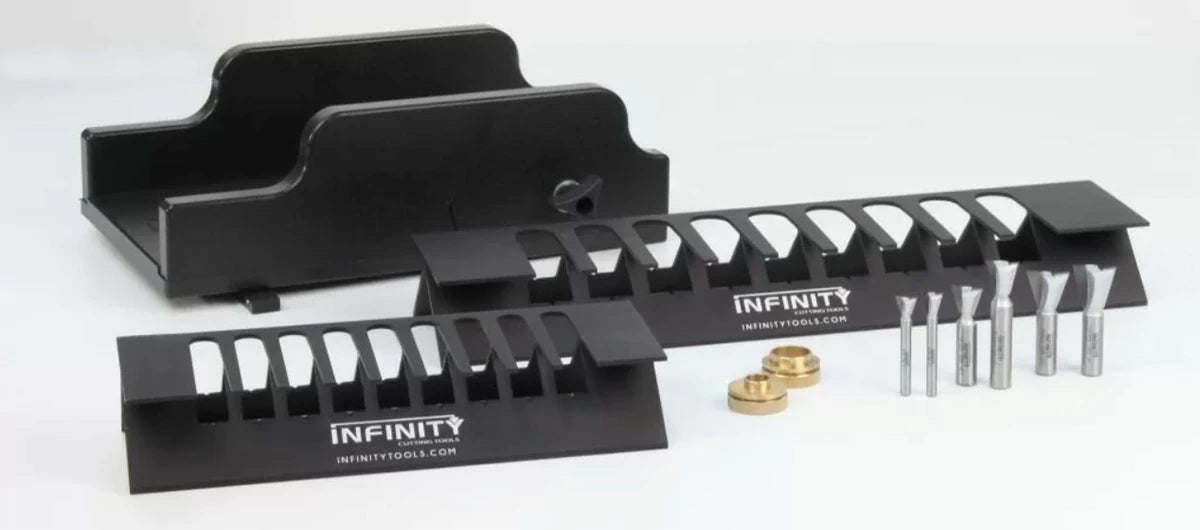
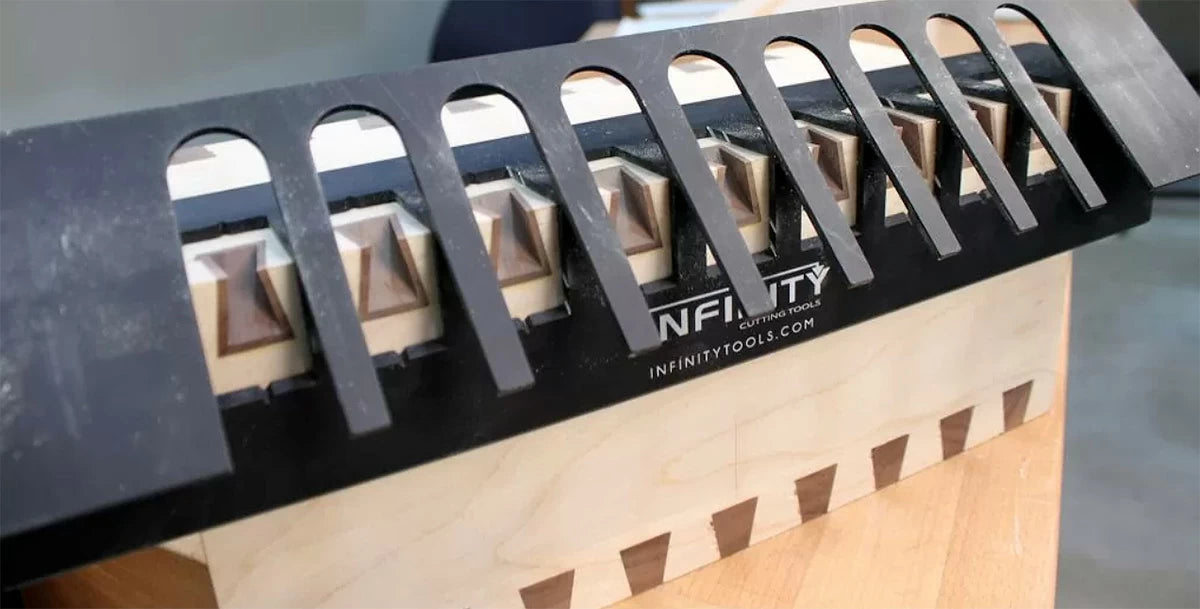
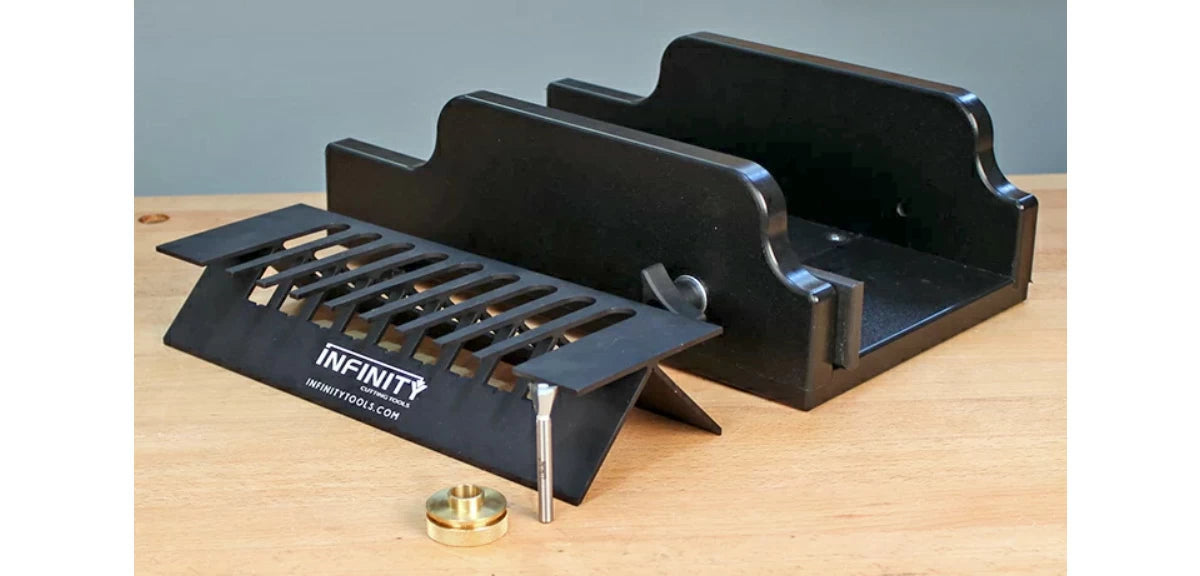
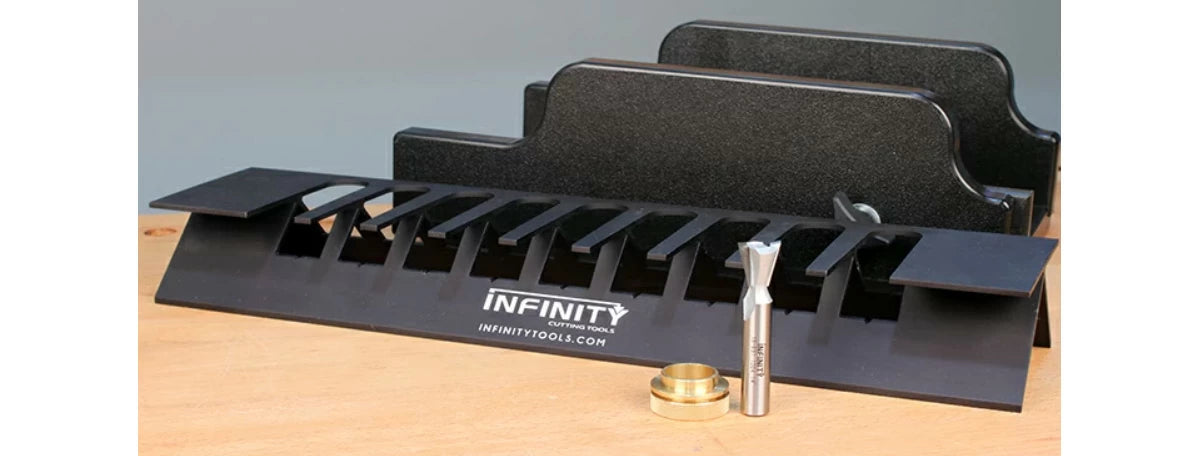
The tapered spline router jig is available in two sizes, a 12" jig and an 18" jig. The 12" jig is great for small projects like jewelry boxes and humidors and can be used with dovetail bits with a cutting diameter up to 5/8". The 18" jig is perfect for larger projects and can be used with dovetail bits with a cutting diameter up to a full 1" and is also perfect for making unique joints like nested dovetails (see below).
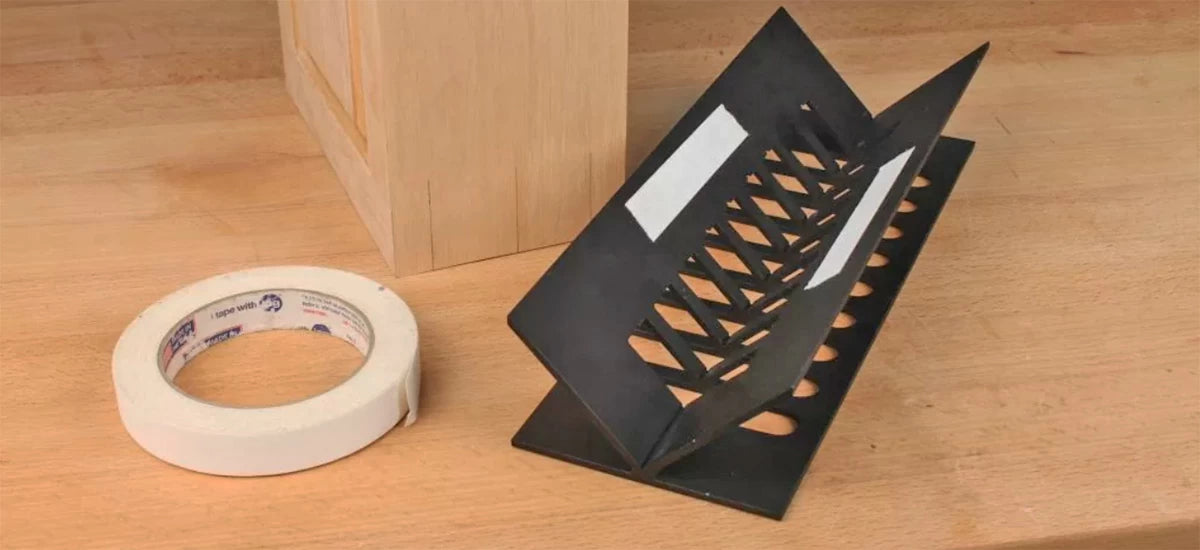
Mark the centerline of the spline locations that you want to add to your box. The spline router jig has V-notches at the center of each opening allowing for custom spline spacing, if desired. Plus, the jig can be indexed for extra-long projects. The default spacing for the spline grooves is 1" from center-to-center on the 12" jig and 1-1/2" on the 18" jig.
With the locations of the splines marked the spline jig can be positioned. I like to use double-sided tape to hold the jig in place but a couple of clamps can also be used.
Step 3: Cut the Tapered Spline Grooves
The included brass guide bushing is used to guide the dovetail router bit through the cut. The bushing can be used in any router or router table that accepts a Porter-Cable-style guide bushing. For smaller projects like jewelry boxes or humidors, I like to use the router table. For larger projects like blanket chests, I use a handheld router. The key when cutting the spline groove is to make sure you follow the entire length of the tapered slot in the spline router jig and make a complete cut. Don't be afraid to make a second pass if you need to.
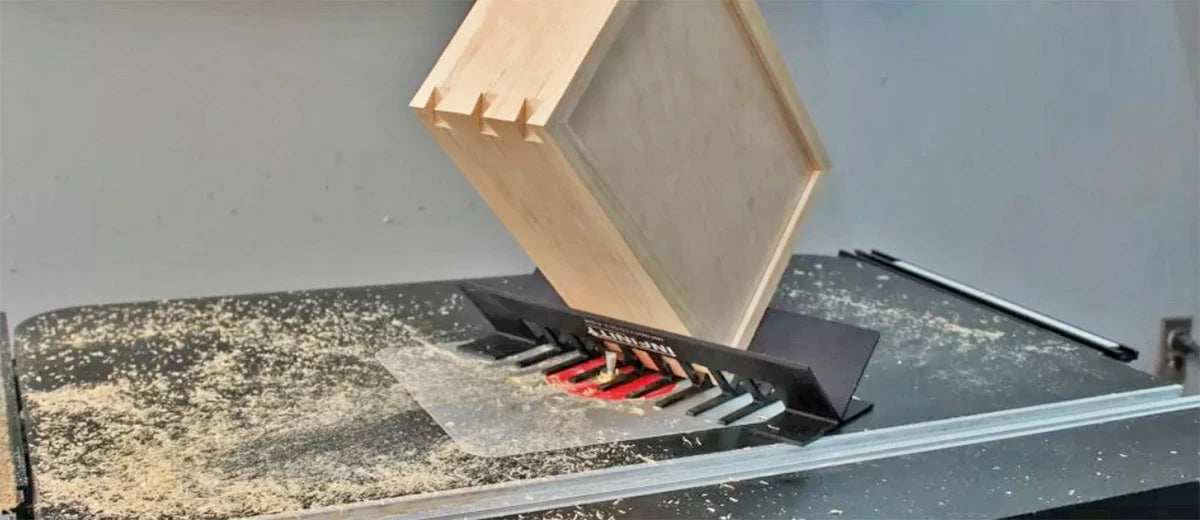
A quick tip for working with splinter-prone material like plywood is to tape the corner being routed with blue painter's masking tape. The tape helps support the wood fibers as the cutter exits the cut, reducing tearout.
Another tip is that I like to mark the front and back of the box to help locate the router jig in the same orientation. The jig is positioned so that the "Infinity" logo is always on these marked faces. This ensures that the larger end of the splines are on one face and the small end of the splines on the adjacent faces. Remember the splines are tapered.
A third tip is that when using large dovetail bits, you can always use a straight bit to hog out some of the waste before routing the dovetails. Just make sure that the diameter of the straight bit is no larger than the smallest diameter of the dovetail bit to be used.
Any angle of dovetail bit will work with the system but I prefer 14° and 18° bits. Because the dovetail bit cuts at 45° to the corner of the box, the effective angle of the bit is reduced by roughly 22%. This means a spline made with a 14° bit will appear to be roughly 11° on the face of the box when finished.
This also means that the spline will appear to be taller than the cutting depth of the dovetail bit. In fact, if a full-depth cut is made with a bit with a 3/4" cutter height, the spline will appear to be almost a 1" tall.
Step 4: Make the Tapered Dovetail Splines
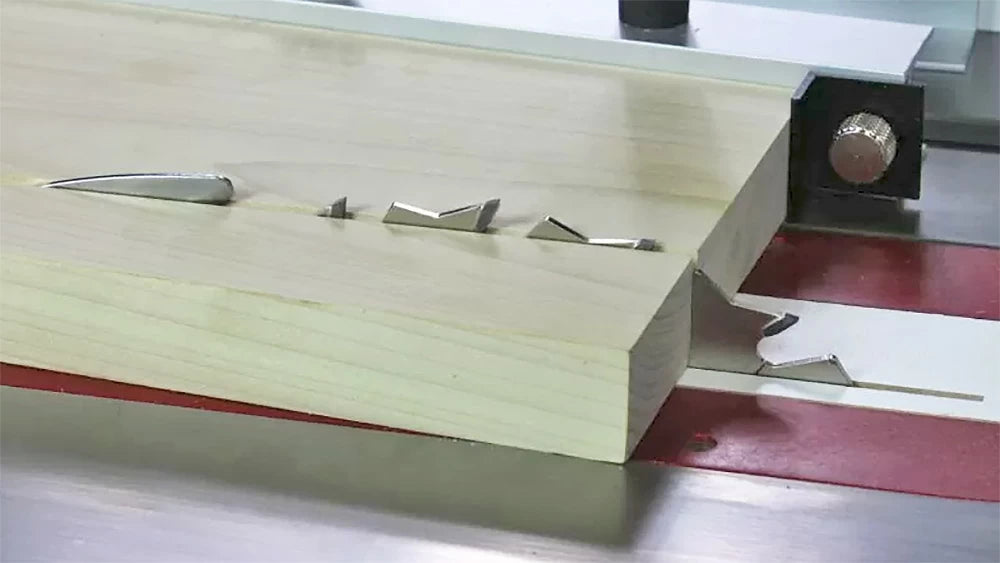
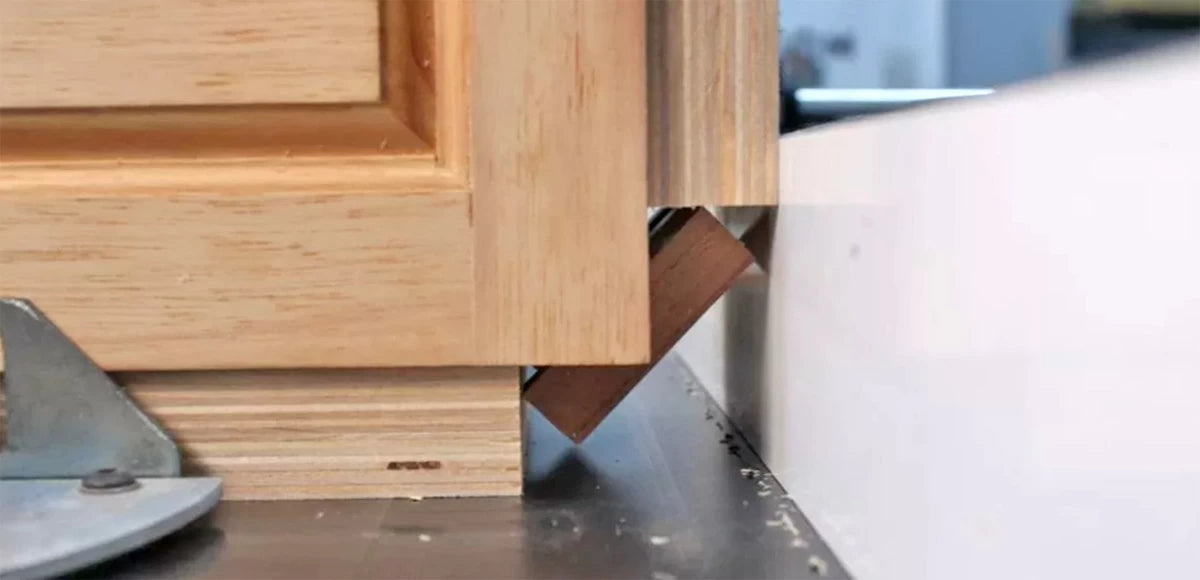
The splines are made at the table saw using the tapered dovetail spline table saw sled. The sled is designed and manufactured for cutting the correct taper on the dovetail splines.
The table saw blade needs to be tilted to the same angle as the dovetail bit used to make the grooves in the box. In other words, if you used a 14° router bit with the router jig, be sure to tilt your saw blade to 14° as well. You can use the dovetail bit as a guide to set the blade angle. An iGaging digital angle guide or Wixey digital angle gauge also comes in handy for this task.
With the blade set to the proper angle, make a cut in the sled to create a zero clearance slot for the blade. I like to make splines out of a piece of material between 2" and 3" long and 8" or so wide with the grain running in the shorter direction (photo below). This results in the grain running the length of the spline, which makes it stronger.
The thickness of the spline blank should be the same as the cutter height on the corresponding router bit. If you're using a dovetail router bit with a 3/4" cutter height, make your splines from a piece of 3/4" thick material.
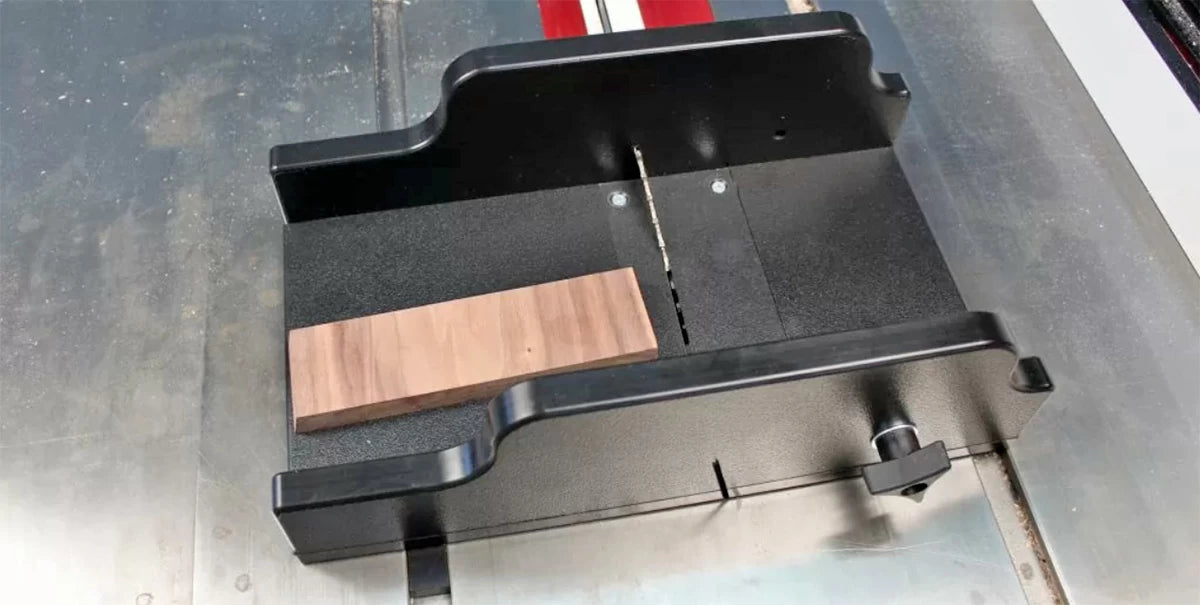
I like to use off-cuts of boards for making splines. You can also glue pieces together to make them wider and easier to work with.
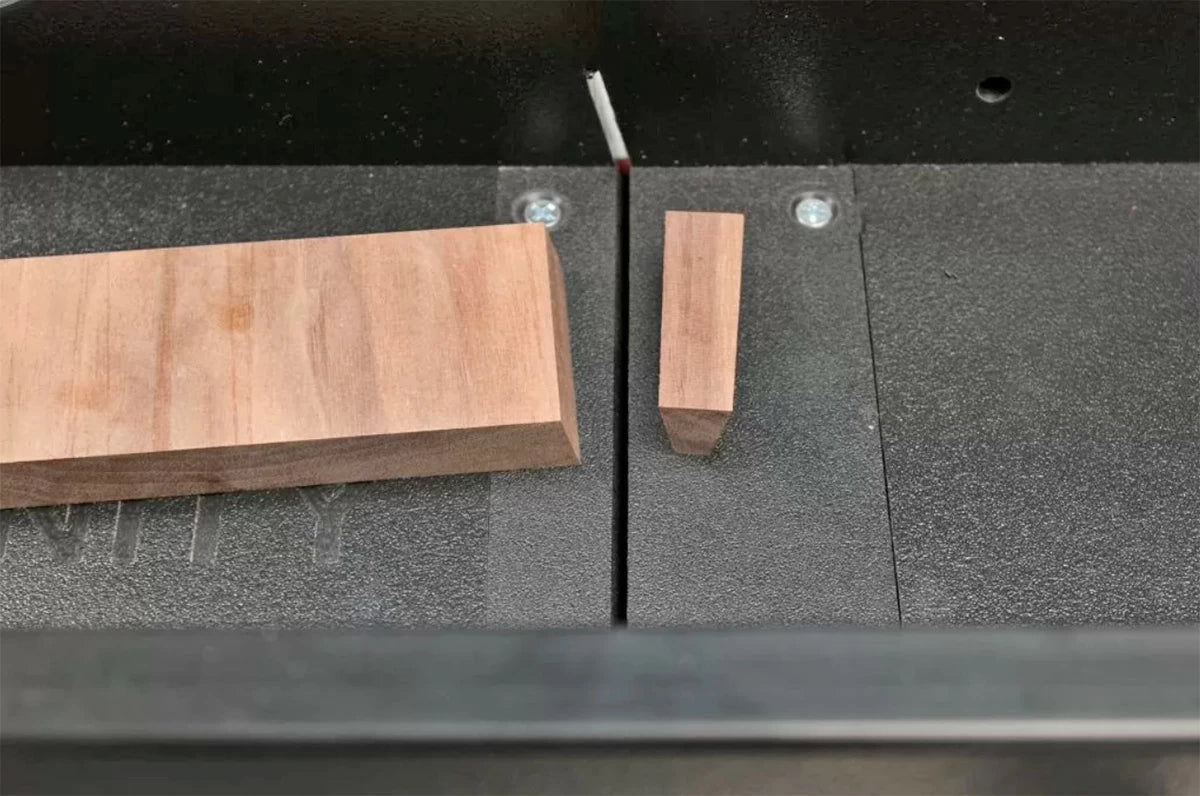
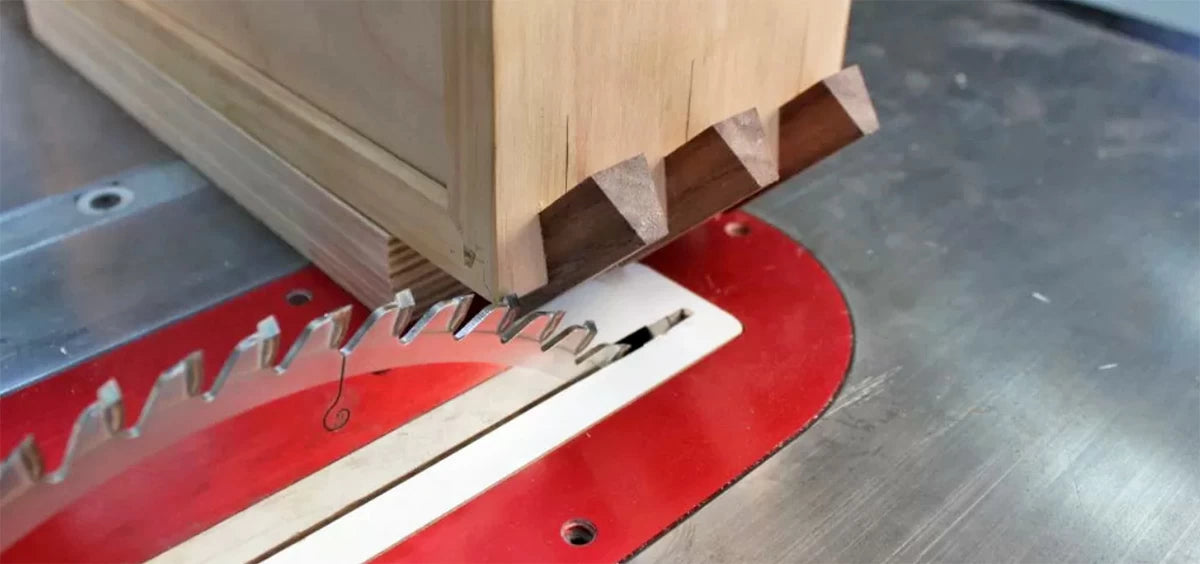
The first cut is made at the edge of the spline blank, then the blank is flipped over and slid against the adjustable stop on the sled. The second cut creates the spline. Test the fit of the spline in one of the grooves in the box. If the spline is too loose, move the adjustable stop on the table saw sled away from the blade. If the spline fits too tightly, move the stop closer to the blade. When the spline wedges securely in the slot with roughly equal overhang on either side, then all of the splines can be cut in rapid order with a cut/flip/cut operation.
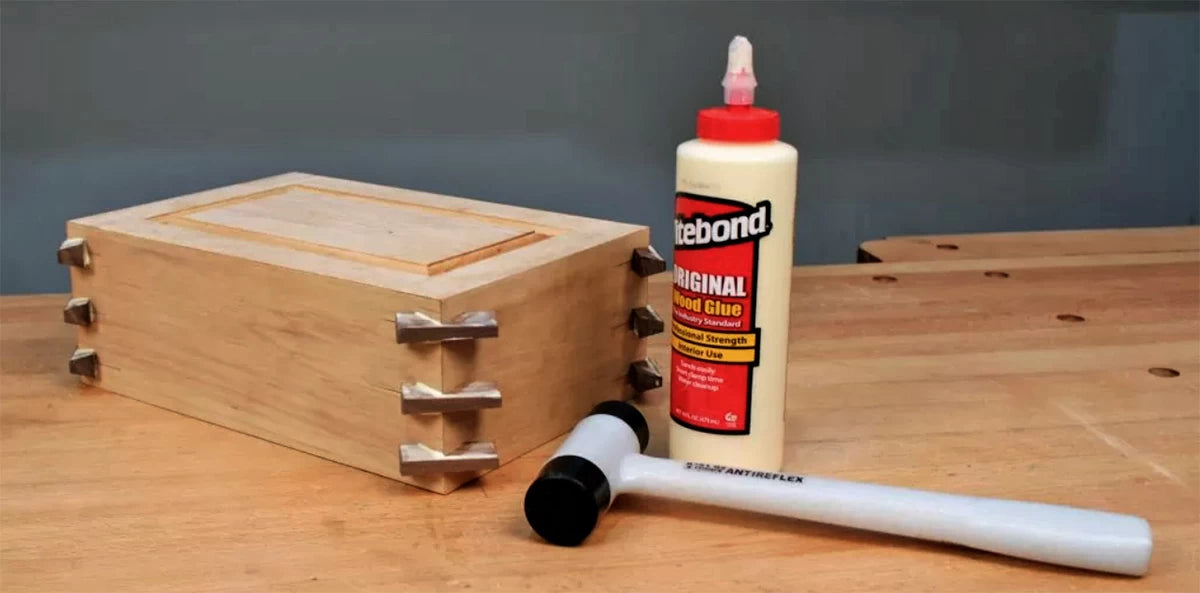
Step 5: Glue and Trim the Tapered Splines
installing the splines is a simple process of applying glue to the splines and sliding them into place. I like to use a small dead-blow mallet to give the splines a tap and lock them into place.
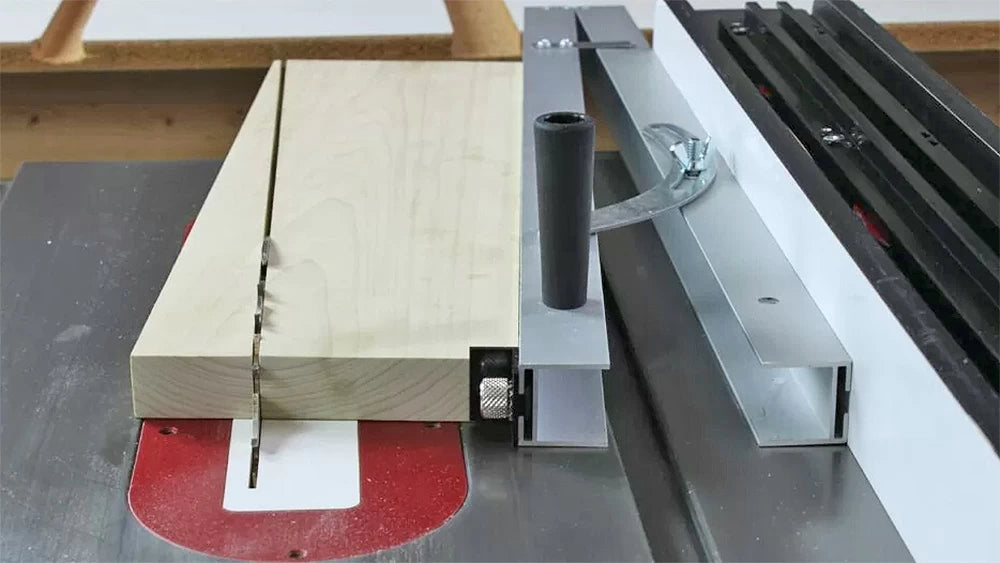
Once the glue is dry the overhanging portion of the splines need to be trimmed away. For this, I go to the table saw. Put a spacer under the box and another against the fence so that the splines are not touching the tabletop or fence, as in the photo below. I use a strip of double-sided tape to hold the spacers in place.
I set the rip fence so that the blade just misses the edge of the box by about 1/16" and then trim the excess off of the splines (see below). With all 4 corners trimmed, I head over to the router table and use a large flush-trim bit to cut the splines flush to the surface of the box. I prefer to use a large-diameter flush trim router bit like the Infinity 06-690 because its 3/4" diameter creates a better angle of attack and reduces the risk of tearout. The shear angle on the router bit's cutters also helps further reduce the possibility of tearout. After trimming all of the splines, the box is ready for sanding and finishing.
Bonus: Nested Tapered Dovetail Splines
The great thing about the Infinity tapered dovetail spline system is you can create some extremely interesting patterns on your boxes. With the 18" tapered dovetail router jig, you can make double — and even triple — nested tapered dovetail splines. In other words, you create one set of tapered dovetail spline joints and then use the router jig with a smaller dovetail bit to rout grooves through the first set of splines. Then you can use a contrasting wood to make splines to fit the grooves within the splines.
To create a nested joint follow the steps listed above then simply reinstall the spline jig, lining up the V-notches in the jig with the center lines made for the first set of splines.
Use a smaller dovetail router bit and cut a new spline slot through the first spline, and install another spline. For nested splines it's important to make sure to set the bit height accurately if you want to have a consistent reveal around the spline joint line.

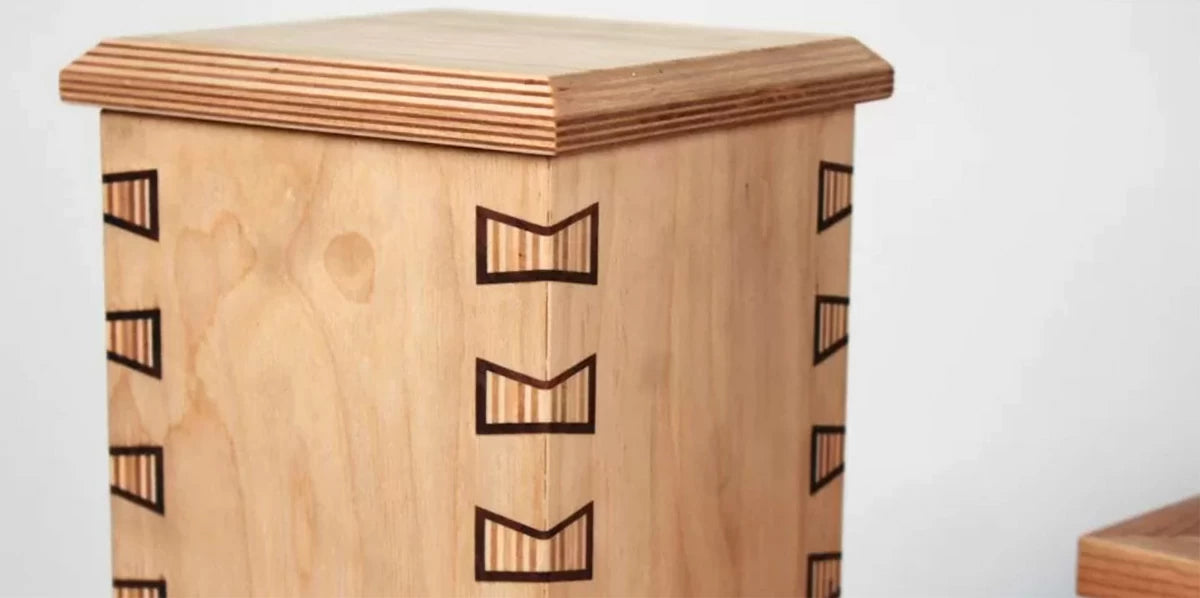
To create one of my boxes, I used Baltic birch plywood to make the box, using lapped miter joints for ease of glueup and added strength. The first set of splines are made of walnut. Then I routed through the walnut splines with a smaller bit using the tapered dovetail router jig. The second set of splines are made from Baltic birch plywood. I think it made a very interesting-looking box that leaves many wandering how it was made. It also shows that you don't have to spend a fortune on wood to make exciting projects.
Exclusive 4-pc. Dovetail Router Bit Package
While the tapered dovetail spline system is compatible with just about any dovetail bit, Infinity Cutting Tools has taken the time to manufacture exclusive dovetail bits that are designed specifically to complement the tapered dovetail system.
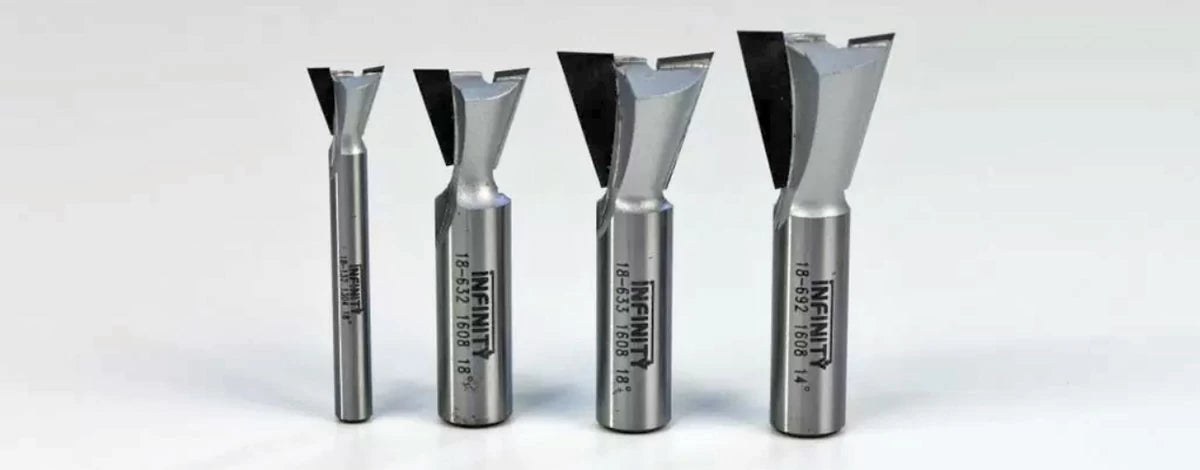
Any dovetail bit with a cutting diameter of 5/8" or less will work with the 12" jig. A dovetail router bit with a cutting diameter of 1" or less will work with the 18" jig.
Remember I mentioned that because the bit is cutting at 45° to the box face, the effective angle of the bit is reduced by about 22%. This means that an 18° dovetail bit creates a spline closer to 14°. A 14° bit will result in a spline close to 11°. This is important to note because a relatively common 7° dovetail router bit comes out at only 5.5°. This isn't enough of an angle, in our opinion, to provide a distinctive dovetail shape. That's why we spent the time to develop these new dovetail bit offerings.
Three Packages. Beautiful Boxes. Guaranteed.
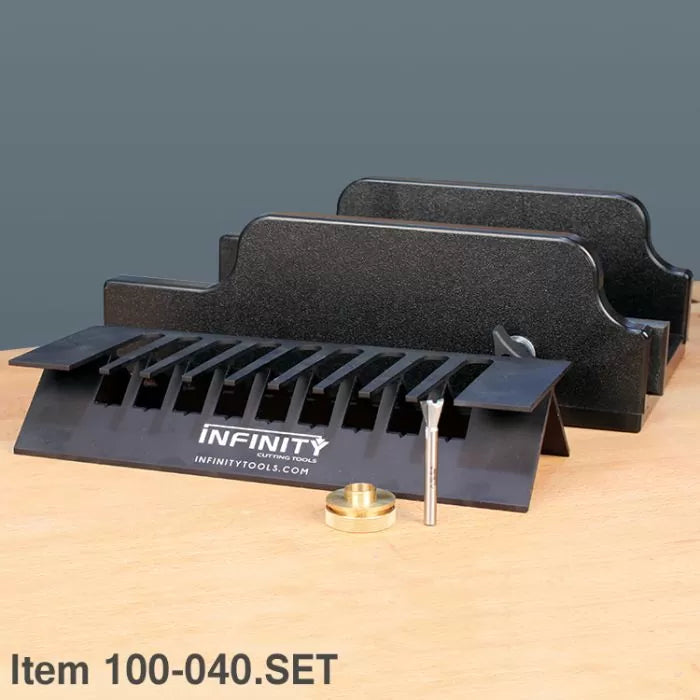
The Infinity Tapered Dovetail Spline System is available in three, money-saving packages.
The 100-041.SET Package includes the 18" tapered dovetail router jig, table saw sled, brass guide bushing, and a 3/4"-diameter, 14°, 1/2"-shank dovetail router bit.
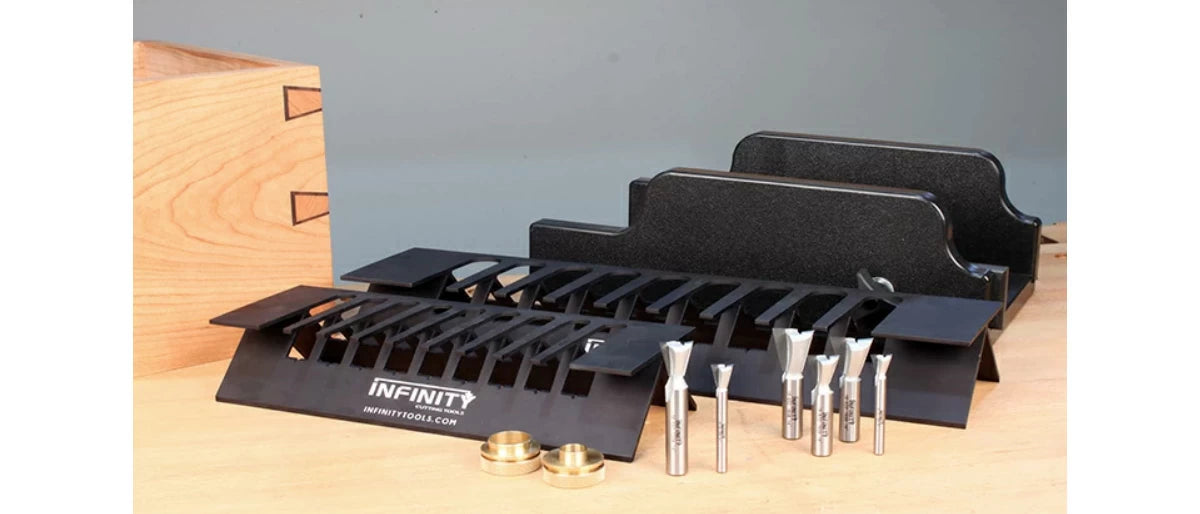
The 100-045.SET Master Tapered Dovetail Spline System provides the best value and includes both the 12" and 18" jigs with their respective brass guide bushings, table saw sled, and router bits, plus an additional, exclusive 4-pc. dovetail router bit set shown above.