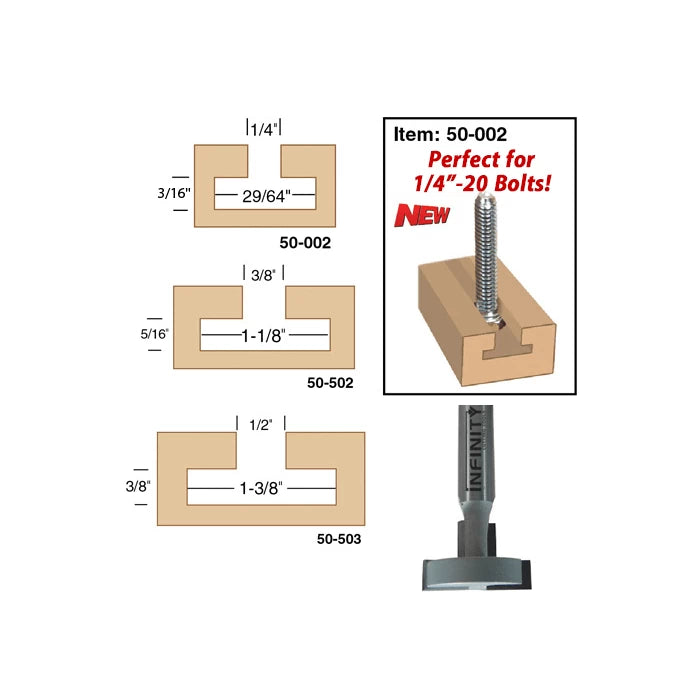

T-slot and keyhole router bits are extremely useful for all types of projects, jigs, and fixtures. They can be used to create keyhole slots for hanging pictures and plaques. You can also make custom T-tracks in shop-made jigs and fixtures. The larger T-slot bits can be used to make custom slatwall boards for shop use or custom displays that you would see in stores. Because these bits are almost always trapped in the workpiece during routing, there are a few tricks to getting the best results and life expectancy out of these router bits. Let me share a few of these tips and tricks.
Making a keyhole slot requires that the router bit be plunged into the work and then moved a short distance before being backed out and removed. It's always a good idea to start by drilling a pilot hole for the keyhole router bit. I like to use a drill bit that is slightly smaller in diameter than the largest diameter of the router bit. This allows the router bit to cut a nice clean entry hole plus, it makes it much easier to plunge the router bit straight in.

Most router bits are designed to cut horizontally but struggle with plunging straight down. Drilling a pilot hole first is recommended when using T-slot, keyhole and many straight router bits.
When cutting a keyhole, I like to mark my workpiece on three sides with a start line and an end line. Then I can use the fence on my router table as a reference so that I know how far I've cut the slot.

I find it easier to reference off of one edge of the router bit when setting up my fence then I do finding the center of the bit. I take this into account when marking my workpiece.

Because most of the sawdust will remain trapped in the T-shaped groove, you will usually need to make the cut and then feed the workpiece backward in order to be able to lift the workpiece off of the bit. This "backrouting" is usually not recommended at the router table so take your time and be sure the workpiece is secure. Also keep a close eye on your start line so that you don't travel too far, lengthening the slot in the wrong direction.

Unlike keyhole router bits, T-slot router bits are generally used to cut all the way from one end of a workpiece to the other. Because these bits are removing a lot of material at a time with very little space for the waste to go, these bits are susceptible to heat buildup. With any T-slot router bit it's recommended to first use a straight router bit to create a groove.

This is especially true when using these bits on a CNC machine. A CNC router doesn't have the ability to "feel" the resistance in the material that can cause a T-slot bit to overheat and break. An initial pass with a straight bit slightly smaller in diameter and 1/16" or so shy of the final depth removes a significant amount of waste while reducing the risk of burning up or breaking the T-slot router bit.

Finally if you're using any of these router bits in your router table, I recommend using featherboards or a set of JessEm Clear-Cut Router Stock Guides to keep the workpiece tight against the fence and table during the cut. This reduces stress on the bit which can cause poor-quality cuts. Because these bits are trapped on all sides it's important to eliminate as much vibration as possible. If you take your time and set up each pass properly your T-slot and keyhole router bits will last much longer and produce superior results.