
I don't know about you guys, but my wife constantly wants me to make gifts for people every year from baby rattles and boxes to Christmas ornaments and small furniture. Every year I try to find easier things to make that are still fun and good looking. Now, I have never made one of the fun routed serving trays that you see from time to time, so I thought this year was a good time to give it the old college try.

What I loved about this build was being able to use up tons of leftover scrap wood and the fact that you can be as creative with the wood variations as you want. I decided to make a bat tray for my niece because I love Halloween and she loves Batman. That seemed like a perfect fit. These trays are pretty easy to make. There are not that many steps and you really just follow a template.
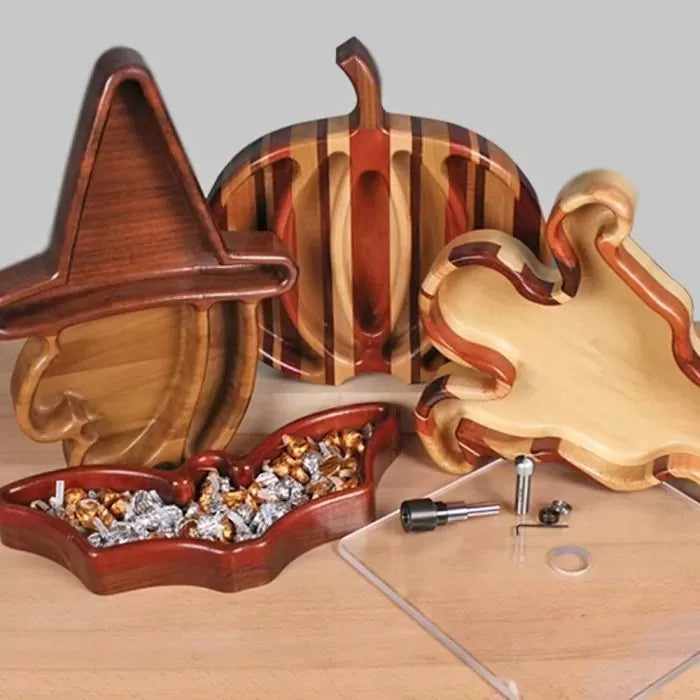
So on to the build; I grabbed Infinity's 8 pc. Halloween Tray making template package and got to work. The Template package includes 4 Halloween-themed templates, a large see-through router base template, a bowl and tray router bit, a router collet extension, and the base plate alignment kit (Infinity also carries a Christmas themed template kit and a standard tray package). The only thing I needed to add to this was a couple of Forstner bits.

The first step to building this was to glue up my block of wood. I went with some maple and walnut scraps and glued up a block large enough for my template to be screwed down on with at least two screws and that would also give me a 3/8" wall around my template opening.
Once I had a large block of wood, I screwed my template down to the block of wood. I then traced out the bat shape onto the wood (if you are using dark wood, get yourself a white pencil).


With the outline drawn, it's time to remove as much of the interior waste as possible. I used a 3/4" Forstner bit and a 2" Forstner bit in my drill press. Get as close as you can to the outline, but still leave yourself some room (maybe a 1/16"-1/8" of material leftover). When you set up the Forstner bit depth, you want to leave a little more than 3/8" (remember that the Forstner's tip extends deeper than the rest of the bit body so take this into account). Now as a quick aside here, I have always used cheap Forstner bits and never thought twice about it. When I was using my older 2" Forstner bit on the maple, it bogged down like nobody's business, so I decided to splurge on a Colt Maxicut 2" Forstner drill bit. Ummm, holy smokes, this drill bit is amazing. Just to let you know, it's an expensive bit, but I have never before had a Forstner that I think of like a hand tool. It really is that good.

So, back to the forstnering (I don't think that was a real word before now). Finish getting as much of the stock out as you can. You may want to grab a chisel and knock out any of the leftover chunks in the middle you might see that you weren't able to get with the Forstner.
Now we can rout. We want to set up a large clear base plate on our router. Once the large clear base plate is on, we can insert the collet extension and our larger diameter 1/2" radius bowl and tray router bit, (item #51-502B). Set the depth of your router to make a very light first cut that will allow the bearing to ride the template and a final cut that will leave 3/8" bottom and clean up any Forstner bit markings. Clamp the template and block of wood securely down. Have a good grip on your router because it will have a tendency to want to grab where there are larger pieces of leftover wood from the forstnering (still probably not a word). We are going to take multiple passes of about 1/4" depth each time.


Rout out material in a clockwise motion along the interior of the template and into the center of the block. You become a bit blind here as the wood chips have nowhere to go. Take your time and try to follow a pattern. Once you have done this first path, dump out the chips, set your router down another 1/4" and make your second pass. Simply repeat this until you take a final light pass on the bottom of the tray. I spent a little more time down here to get as smooth of a surface as I could. I also switched to our smaller diameter 1/4" radius bowl and tray router bit, (item #51-501B) to get into the tighter radius curves that were on the bat. I only like to use the smaller bit at the very end.

That's how you do the interior. Hopefully, it should be fairly smooth with only light sanding needed to finish the interior.
For the exterior, you need to draw a 3/8" wall around the interior bowl. To do this, remove the template and use either a compass, dashes and freehand or a homemade jig to draw a nice line. You need to cut away the exterior waste now and you can do this at the bandsaw or with a jigsaw. Try to keep a slow steady pace as it will allow a cleaner edge for your cut which means less sanding in the next step.

After the exterior waste is removed, it's time for everyone's favorite part: Sanding, and let me just tell you that this is the part that took the longest for me. Use whatever sanding means are at your disposal to get as smooth of an exterior and interior as possible. This is also the time to put a roundover on the top of the wall and bottom edge. I used a small 1/4" radius roundover router bit (item #38-754) for this.

For finishing, use a food-safe finish that is FDA approved. Any of the cutting board or salad bowl finishes will work and should be plenty durable enough for this. Now that I have knocked out a Halloween tray, I think my wife is going to be wanting me to push out a few Christmas trays. Oh well, let's go grab some scraps of wood.